


How to Cut Dog Nails: A Guide
Trimming your dog’s nails allows your pup to enjoy a variety of benefits. Trimmed nails help keep your dog comfortable while walking, and can also help prevent damage to carpets or paws during your dog’s normal daytime activity.
As an integral step in the at-home grooming process, trimming your dog’s nails helps you adopt a proactive approach to your dog’s health and hygiene. You’re more likely to notice sensitive spots in your dog’s paws—or anything else that looks out of the ordinary—when you take the time to trim their nails.
Conversely, dogs with untrimmed nails are subject to several potential health complications. Untrimmed nails can snag on indoor or outdoor materials, compromising your dog’s mobility and heightening their risk of injury. Nails that are not trimmed can also grow to an excessive length, where germs and bacteria can live and grow.
With the right grooming supplies, learning how to clip dog nails yourself can save you time and money. Over time, trimming your dog’s nails can even become an activity that brings you closer to your pet.
Select Your Tools
Before you begin learning how to trim dog nails, you’ll want to make sure that you have the right gear for the job. Examine your grooming toolkit to ensure you have access to what you’ll need to promote a quick, comfortable experience for your dog.
When cutting your dog’s nails, you might need the following supplies:
- Nail trimmers
- Nail clippers
- A nail file
- Styptic powder
- An electric nail grinder
If your dog is particularly anxious or antsy, have treats or toys ready as a distraction.
Acclimate Your Dog
Make sure your dog is comfortable with your tools before the process begins. Often, pet owners will familiarize their dogs with nail clippers and other tools in a rewards-based progression.
First, allow your dog to sniff your nail clipper, nail grinder, nail file, or any other tools you will use. Provide treats to further establish a non-threatening environment.
Next, lightly touch your dog’s paws with each tool and offer another treat once you remove the tool. Repeat this process until your dog is fully familiar and comfortable with the feeling.
After your dog is accustomed to your tools, it’s time to familiarize them with the sounds those tools make. Click the nail clippers or turn on the nail grinder—while touching them to your dog’s paws—and again wait for your pup to grow comfortable with the process before continuing.
Once your dog is fully acclimated to the tools and the process, you can proceed with the next steps.
Position Your Dog’s Paw
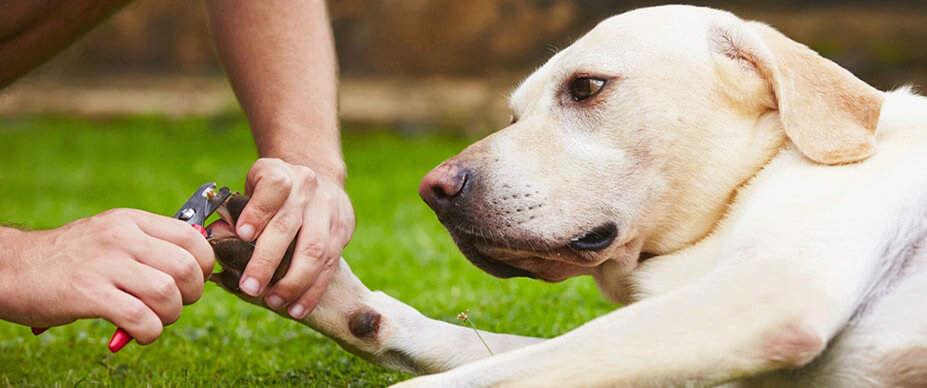
After you have practiced touching your nail clipping tools to your dog’s paws, position your dog so that they can comfortably raise one paw at a time. Sit directly in front of your dog to accommodate their position rather than them needing to accommodate yours. When you’re ready, place one paw gently yet firmly in your hand, and secure it with a few fingers.
Determine Where to Cut
With your dog’s paw in your hand, determine the most appropriate place to begin trimming. Most often, you’ll want to start at the tip of your dog’s nail and work your way back. Be sure to stop before you reach their quick, which is the blood vessel running through the nail.
If you cut too far up the nail, you’ll risk breaching your dog’s quick or cutting their skin. Take extra care if your dog has sensitive skin to avoid irritating them and making the remainder of the nail-trimming process more difficult.
Make the Cut
After you have your dog’s paw in your hand and you’ve determined where to cut, take a moment to make sure your dog is still in a relaxed state. If they are not, it’s time to take a step back and reacclimate them to the process and the tools. Trimming your dog’s nails when they are anxious can result in anxiety, stress-related urination, and damage to nails if they pull away mid-cut.
With a firm grasp of your dog’s paw and a nail clipper or trimmer in hand, begin to cut your dog’s nail. You don’t need to clip the entire nail at once. Instead, take your time clipping or trimming dog nails in stages, and remember to maintain a steady hand.
Look Out for Bleeding
Watch out for bleeding during or after the nail-cutting process. If your dog bleeds at any point while you are trimming their nails, it could be because you cut too close to the quick. In other cases, your clipper may have made contact with their skin in a way that resulted in bleeding.
If you notice blood while cutting your dog’s nails, stop the nail-trimming process. This is why keeping styptic powder nearby is a good idea, especially when you’re suddenly wondering how to stop your dog’s nail from bleeding quickly. Simply apply it to the affected area, which will instantly coat it and help stop the bleeding.
Reward Your Dog
Nail clipping can be an anxiety-inducing process for some dogs. Have treats or toys on hand before you begin to trim your dog’s nails, and provide these rewards frequently as you clip. Offer a steady stream of praise as a supplement to any physical rewards so your dog can hear positive reinforcement in a voice familiar to them.
Many dogs come to prefer the nail-trimming process once they positively associate trimmed nails with treats. By rewarding your dog throughout the nail-trimming process, you’re helping to stave off anxiety and replace it with canine peace of mind.
Pay Attention
Trimming your dog’s nails isn’t a one-time activity. Once you learn how to cut dog nails, you’ll also need to pay attention to how your dog’s nails grow back over time, and keep in mind that different nails can grow at different rates. Don’t assume that the nails on one of your dog’s paws are the same as the others.
Pay close attention to each nail on each paw when you examine your dog’s nail growth. Look out for snags, excessive growth, compacted dirt, or other signs that could indicate a need for their next session.
It’s best to adopt a proactive approach when examining your dog’s nails. If you can tell that your dog’s nails will shortly need to be trimmed, trim them sooner rather than later. When you learn how to clip dog nails before they become too long, you can help your furry friend avoid health issues, decrease the risk of snags, and improve the quality of their walk and pace.
